Project of the day
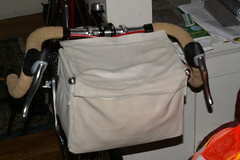
Damp, a little bit wilty, but it survived the first ride in the rain.
Last year, around the time I extracycled my Trek, I purchased a Nitto F15 handlebar bag holder. I fussed around with it for a while, but eventually decided not to put it onto the Trek because that made it look a little bit too ridiculous for my tastes. So it’s been sitting unused for the past year, until I started slowly gathering parts for the midlifecrisismobile. Now, the midlifecrisismobile is going to have a porteur rack on it, and the grand plan is that I’m just going to plunk down a bag on that rack (and carry a couple of straps so I can wedge boxes of donuts under the bag when I go out shopping) but the grand plan requires that I (a) build a rack and (b) build a bag.
I can’t do anything about the rack until I get a brazing torch, flux, and brass rods to melt all over the rack. But I can do something about the bag; my previous attempts at making a bag were somewhat less than completely successful, so I thought that if I first drew up plans and then built a prototype bag or two I’d be able to make a respectable looking bag when I finally glued the rack together and bolted it to the midlifecrisismobile.
And if I built a prototype rack, I would need to test it in real life, because I’d hate to make a pretty cloth box that messily disintegrated as soon as I went out on the line. And to do that, I would need to use some other method to attach the rack to the bicycle…
Oh, happy coincidence!
So on Tuesday I sat down and drew up a some drawings, wrote down some dimensions, and made sure I had enough parts to assemble a box. And on Thursday, I spent the bulk of the day cutting out canvas panels and sewing them together. And this morning I sewed/goo'ed on some velcro pads (a final bag will use snaps or buckles as closures, but I had some scrappy velcro lying around that I could use for free), spent about 45 minutes waxing the canvas, then loaded up the bag (raincoat, longsleeve woolen shirt, first aid kit, emergency blanket, gloves, 5 cookie bars, and my Pentax) and went for a ride, in the rain, down to the Columbia River (via the Springwater Trail and the Woody Guthrie Trail) and back to verify that the thing actually worked.
And it did. It rained hard enough so that my upper half got pretty much wet through, but the contents of the waxed bag stayed dry. Nothing fell out, even after a couple of pretty substantial jounces over cracks and tree roots in the path, and the little velcro patches on the thing remained stuck to each other without fuss or muss.
The gory details of this bag are possibly a bit too gory for anyone to duplicate, because I used a scrap of canvas that I got at the Mill End store on spec, but if you want to try and duplicate what you see here you need (all dimensions in mm & all canvas pieces need 5-10mm margin for hemming; if I say “140x90”, you need to cut 150x100 to 160x110):
- (1) 250x520 canvas (front/bottom/back)
- (2) 150x185 canvas (sides)
- (1) 250x200 canvas (lid)
- (2)140x90 canvas (carrier loops)
- (1) 60x150 canvas (back loop)
- (2) 150x170 TRIANGULAR canvas (lid flaps)
- (1) 250x150 COROPLAST, corrugations running across the long side of the panel (bottom stiffener)
- (1) 60x45 velcro patch
- (1) 60x15 velcro patch
- 1 piece of paraffin wax
To assemble,
- Hem the carrier loops, then sew the end over in a ¼" tube (just a little larger diameter than the Nitto tubing.)
- Sew the carrier loops to the side panels with the loops being 170mm above the bottom of the side panel centered.
- mark the 520x250 piece for the front/bottom/back; the back is 180mm deep, the bottom is 150mm across, and the front is 190mm.
- Pin the side pieces to the front/bottom/back inside out (so the seams are facing out)
- Sew the side pieces to the front/bottom/back. You now have a box that can be fastened to the Nitto handlebar bag holder.
- Hem the lid.
- Hem the back and sides of the box. I changed from my plans here and hemmed the top down to 175mm (just above the carrier loops) but if you want a little extra room don’t do this.
- Mark 30mm from the front of the lid (this will be where it fastens to the front edge of the box) and crease there. The lid now looks like an elongated L – the lid part is 170mm, and there’s a 30mm ledge hanging down.
- Sew the lid ledge to the box.
- Hem the triangular pieces.
- Sew the 150mm sides of the triangular pieces to the inside top edge of the box sides.
- Sew the 170mm sides of the triangular pieces to the sides of the lid (I didn’t do this correctly, and ended up with littler triangles; the plan is to have the triangular pieces longer than the box so they will shed water to the outside and not into the box. This may not matter, but if you’re doing it right it won’t be an unhappy surprise later.)
- Hem the back loop.
- Fold the back loop over 60mm from the top. Sew the bottom part of the back loop to the top center of the back of the box.
- Sew the fuzzy part of the 60x45 velcro patch to the top part of the loop, and the hooky part to the bottom part. There should be 30mm between the two pieces, centered on the fold mentioned in part 14.
- Reinforce all corners by hand-sewing
- Wax the outer surfaces of the bag.
- Stuff the 150x250 piece of coroplast into the bottom.
- Sew the fuzzy part of the 60x15 velcro patch to the outside of the back loop (the 60x45 pieces are on the inside, and when the loop is folded over the back on the Nitto F15 the little velcro patch should be facing upwards.
- Sew the hooky part of the 60x15 velcro patch to the center back edge of the lid, so that when you close the lid it sticks to the other 60x15 part.
- Install the bag onto the Nitto F15 (which is already on the bicycle?) by putting the two horns through the carrier loops on the side of the bag, then wrapping the back loop around the central part of the back tube (over the Nitto F15 label.) The bolts and washers can be replaced on the end of the tubes now for paranoia’s sake.
- Put stuff into the handlebar bag and go out for a ride.
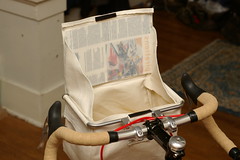
Since this is a prototype, it’s missing a few features that you might want. I left the lining out so I could see if any water leaked through my homemade waterproofing, but it’s just a matter of a 660x250 + 2 180x150 liner pieces, sewn together, sewn to the lid and top of the box and tacked into the bottom corners. A map holder is needed, but that requires a trip to Mill End to get good clear plastic (or you can get a map case and tack that to the lid (I sewed a piece of clear plastic to the inside of the lid to stiffen it until I get a map holder installed) before I put it on, and I should really have an exterior pocket on the back for the first aid kit (If I’m hurt, I don’t want to have to dig through the whole handlebar bag to get out the medical supplies.) But it does have one big advantage even as it stands; I can put my camera in front of me and pull it out in one easy step when something interesting comes by.

